Lee Froese
Web Developer
Pinterest Ad Conversion Tracking
I recently was tasked with setting up Pinterest conversion tracking for an ecommerce store. I found the documentation out there to not be fully clear and easy to understand, so here's my take on setting this up using Google Tag Manager and some development to implement a GTM dataLayer on the website.
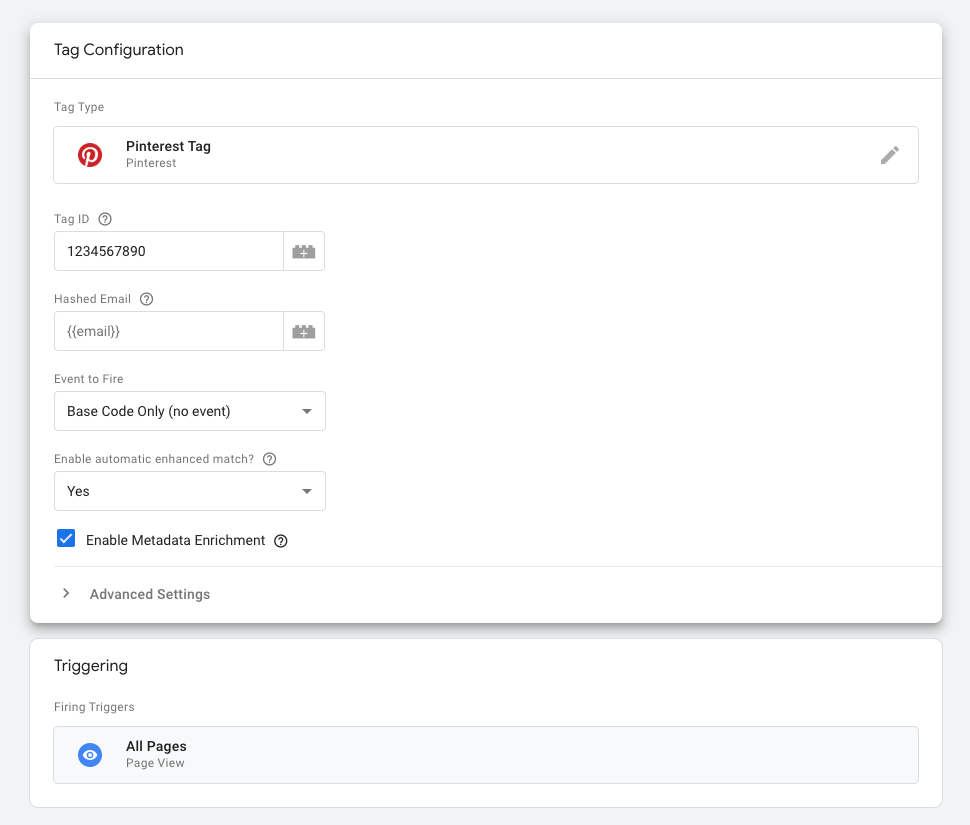
1. Setup the base Pinterest tag in GTM
- In Google Tag Manager, select Tags from the left hand menu.
- Click the New button.
- Give the tag a name i.e. Pinterest - Base Tag.
- Click the Tag Configuration box and search for "Pinterest".
- Select Pinterest Tag.
- Enter the Tag ID from Pinterest Ads.
- In the Event to Fire dropdown, select Base Code Only and choose Yes or No for the Enable automatic enhanced match? field depending on your needs.
- In the Triggering section, select the All Pages trigger so the Pinterest tracking code loads on all pages.
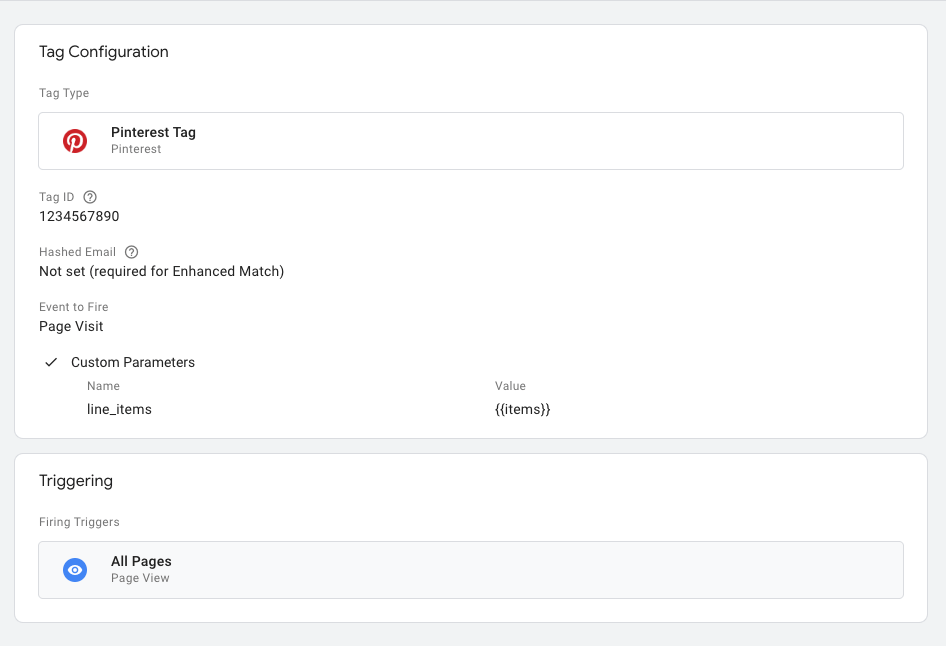
2. Add Pageview Conversion Tracking
- Select Tags from the left hand menu.
- Click the New button.
- Give the tag a name i.e. Pinterest - Base Tag.
- Click the Tag Configuration box and search for "Pinterest".
- Select Pinterest Tag.
- Enter the Tag ID from Pinterest Ads.
- In the Event to Fire dropdown, select Page Visit.
- In the Triggering section, select the All Pages trigger so all pages have a page visit conversion.
3. Add Cart Conversion Tracking
- This section requires adding a dataLayer and pushing it to GTM by adding some front-end code to your website. If using WooCommerce for example, you can alter the /woocommerce/single-product.php WooCommerce template that you've placed in your WordPress theme and include the following:
<?php
$product = wc_get_product( $post );
$terms = get_the_terms( $product->get_id(), 'product_cat' );
$term = $terms && $terms[0]->name != 'all' ? $terms[0]->name : $terms[1]->name;
?>
<script>
window.dataLayer.push({
  event: 'pin_cart',
  value: <?php echo $product->get_price(); ?>,
  currency: 'CAD',
  order_quantity: 1,
  line_items: [{
    product_name: '<?php echo $product->get_name(); ?>',
    product_id: <?php echo $product->get_id(); ?>,
    product_category: '<?php echo $term; ?>'
  }]
});
</script>
- You should then see the pin_cart event when using the GTM preview / testing tool.
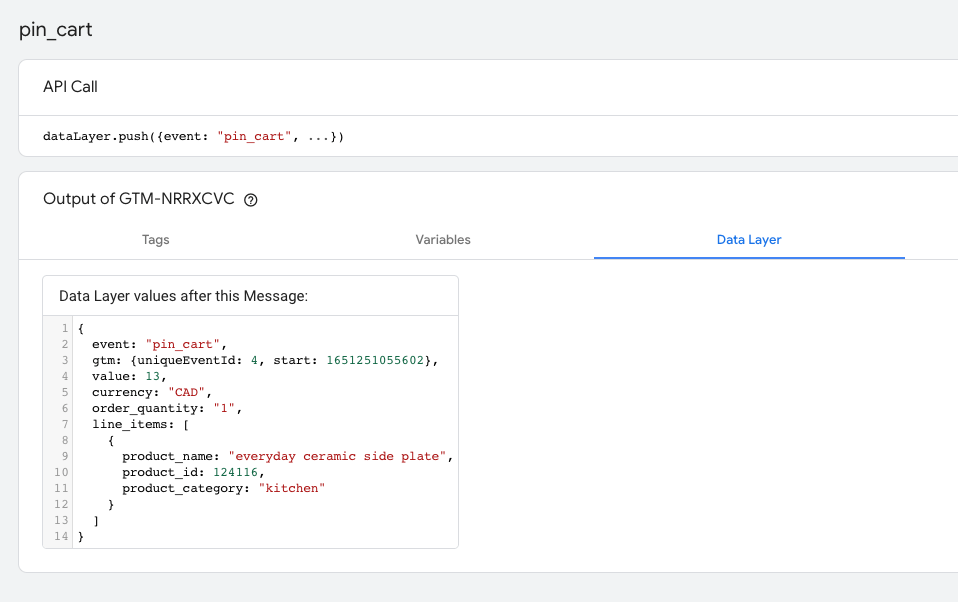 . If you don't see the event, ensure that strings have quotes around them and there are no other syntax or code errors.
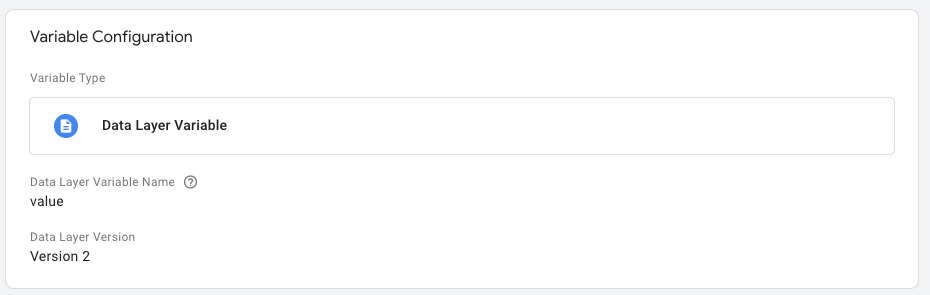
 - In GTM, go to Variables in the left menu and click "New" under User-Defined Variables
- Create a new variable called valuePrice and for the Data Layer Variable Name enter value.
- Create another new variable called currencyCode and for the Data Layer Variable Name enter currency.
- Create another new variable called orderQty and for the Data Layer Variable Name enter order_quantity.
- Create one more new variable called lineItems and for the Data Layer Variable Name enter line_items.
- Next, go to Triggers in the left menu and create a new Trigger.
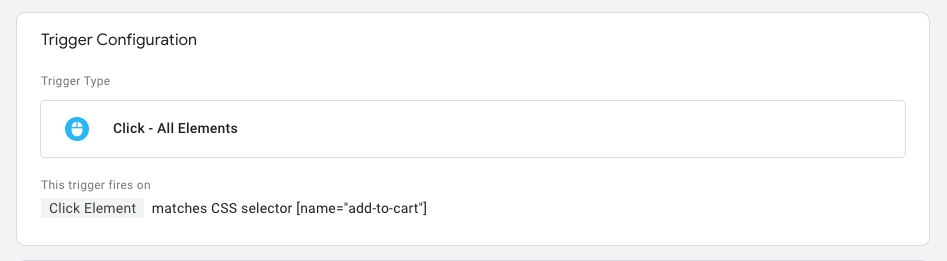
- Call it Add to Cart Button and select Click - All Elements as the trigger type.
- Set This trigger fires on to Some Clicks and set the conditions as necessary. I used Click Element, matches CSS selector, [name="add-to-cart"] to target the Add to Cart button on the website.
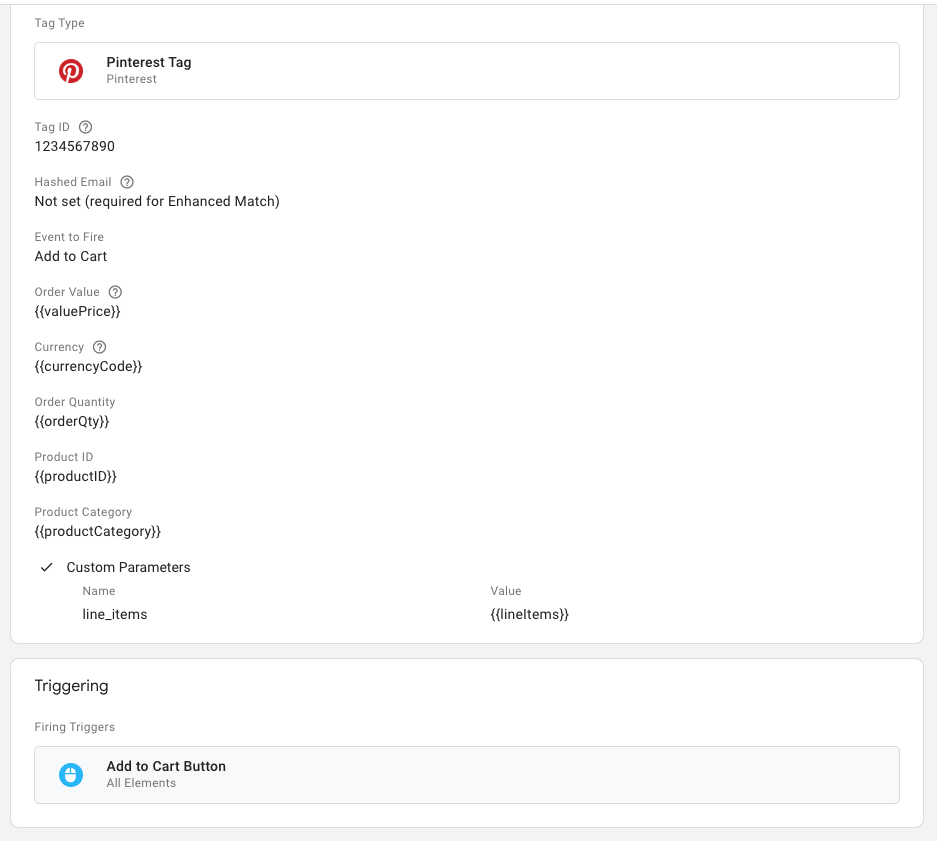
- Next, go to Tags in the left menu and create a new "Pinterest Tag* in the same way as before.
- Enter the Tag ID from Pinterest Ads.
- In the Order Value field, select the valuePrice variable that was created.
- In the Currency field, select the currencyCode variable that was created.
- In the Order Quantity field, select the orderQty variable that was created.
- Turn on the Custom Parameters and click Add Row. Enter line_items for the name, and select the lineItems variable that was created.
- In the Triggering section, select the Add to Cart Button trigger that we just created.
4. Add Checkout Conversion Tracking
- This section also requires adding a dataLayer and pushing it to GTM by adding some front-end code to your website. If using WooCommerce for example, you can alter the /woocommerce/checkout/thank-you.php WooCommerce template that you've placed in your WordPress theme and include the following:
<?php
$line_items = [];
foreach ( $order->get_items() as $item_id => $item ) {

    $product_id = $item->get_product_id();
    $terms = get_the_terms( $product_id, 'product_cat' );
    $term = $terms && $terms[0]->name != 'all' ? $terms[0]->name : $terms[1]->name;

    $item_array = [
        'product_name' => $item->get_name(),
        'product_id' => $product_id,
        'product_price' => $item->get_total(),
        'product_quantity' => $item->get_quantity(),
        'product_category' => $term
    ];
    $line_items[] = $item_array;
}
?>
<script>
window.dataLayer.push({
  event: 'pin_checkout',
  order_email: '<?php echo $order->get_billing_email(); ?>',
  value: <?php echo $order->get_total(); ?>,
  currency: '<?php echo $order->get_currency(); ?>',
  order_quantity: <?php echo $order->get_item_count(); ?>,
  order_id: '<?php echo $order->get_id(); ?>',
  line_items: <?php echo json_encode($line_items); ?>
});
</script>
- In GTM, go to Variables in the left menu and click "New" under User-Defined Variables
- Create a new variable called orderEmail and for the Data Layer Variable Name enter order_email.
- Create one more new variable called orderID and for the Data Layer Variable Name enter order_id.
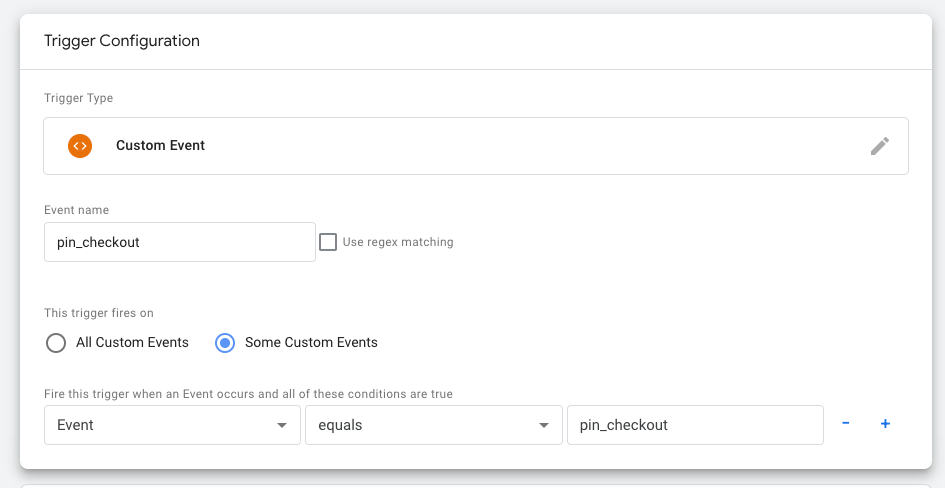
- Next, go to Triggers in the left menu and create a new Trigger.
- Call it pin_checkout and select Custom Event as the trigger type.
- Set Event Name to pin_checkout and This trigger fires on to Event, equals, pin_checkout
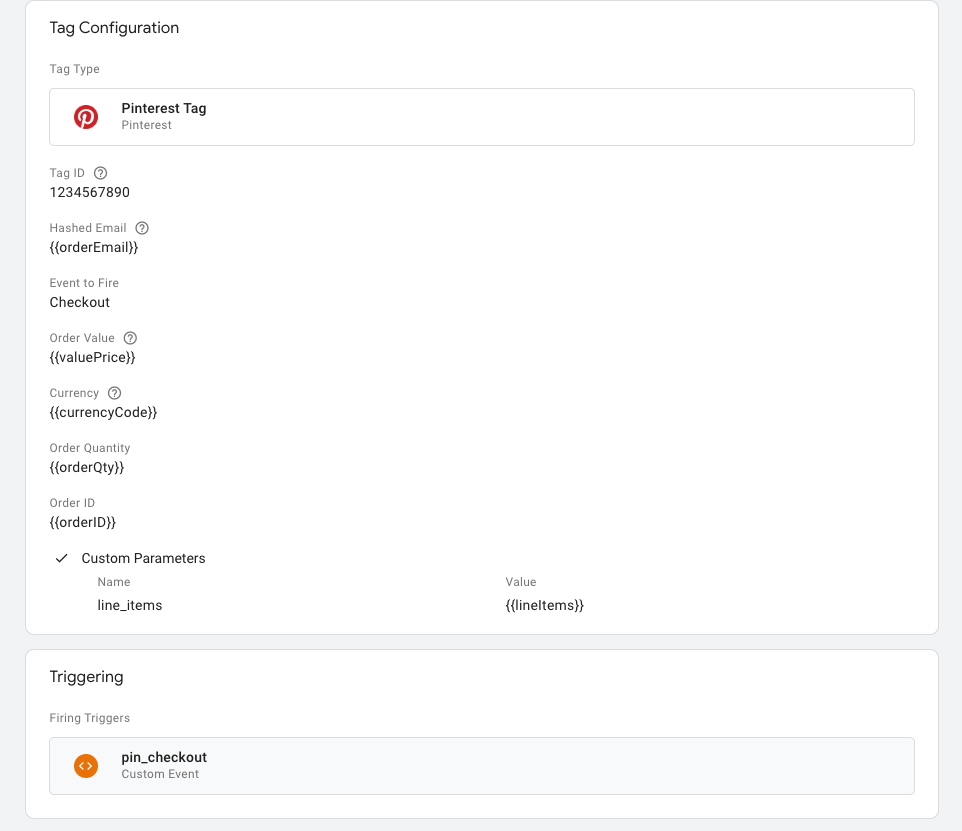
- Next, go to Tags in the left menu and create a new "Pinterest Tag* in the same way as before.
- Enter the Tag ID from Pinterest Ads.
- In the Hashed Email field, select the orderEmail variable that was created.
- In the Order Value field, select the valuePrice variable that was created.
- In the Currency field, select the currencyCode variable that was created.
- In the Order Quantity field, select the orderQty variable that was created.
- In the Order ID field, select the orderID variable that was created.
- Turn on the Custom Parameters and click Add Row. Enter line_items for the name, and select the lineItems variable that was created.
- In the Triggering section, select the pin_checkout trigger that we just created.
Voila
You should now see the conversion tracking working! There's also a nice little Pinterest Tag Helper extensiom for Chrome to help you test.